Dynamic expressions in tool descriptions
Dynamic tool descriptions
The tool editor allows you to describe the features and behavior of your command line tool. The resulting description is used to create an interface between your tool and other tools so that they can be connected into functional workflows.
If your tool has a certain behavior, controlled by a command line option argument, that you don’t want to ever vary with executions, you can ‘hard code’ this into the tool description. On the other hand, if you want to chose the argument every time you run the tool, you can manually input it with each execution. But, in many cases, a middle way is more appropriate: although the required argument will vary with executions, it should do so in a deterministic way, dependent on other features of the tool execution.
To achieve this behavior, you can enter the argument using a dynamic expression in your tool description, rather than a literal. It can be expressed in terms of the inputs, outputs, or other aspects of a tool execution; the object that the expression refers to will then be determined at runtime on the basis of the values of these other objects.
Using dynamic expressions
Dynamic expressions are given in Javascript. You can enter a dynamic expression anywhere in the tool editor where you find the symbol </>. For example, you could enter the Javascript expression 1+2, or a function body such as ${return 1+2}.
Places where you might want to use dynamic expressions include:
- Specifying the command options for your tool. Options related to tool inputs are set on the Input Ports section, and others are set in the Arguments section.
- Specifying stdin and stdout.
- Setting the resources allocated to your tool (memory and CPU number).
- Setting up the glob pattern to catch outputs.
- Specifying secondary files for inputs and outputs.
- Specifying files available in the working directory prior to command execution.
Predefined Javascript objects
Some Javascript objects have been defined in the scope of the tool execution, and are available for you to use in dynamic expressions to increase their expressivity. The objects, inputs, self and runtime, denote properties of the ongoing tool execution (the job), and the tool’s inputs or outputs in a given execution. They are described below.
The inputs object
This is an object that denotes the inputs for the tool. Recall that tool inputs include files and parameters.The inputs object has the properties <input_id> and <input_value>.
<input_id> is the ID that you have labeled each input port with on the tool editor.
<input_value> refers to the object that is entered into the port named <input_id>. It is set according to the following rule, illustrated in the table below: If the object entered into the port named <input_id> is any data type other than a file, then <input_value> is the object itself. If the object entered into the port <input_id> is a file, then <input_value> is four objects that describe, and uniquely determine, the file.
| Data type input to the port named input_id |
|
|---|---|
|
File |
The following objects are the
|
|
String |
The string entered to the input port. |
|
Enum |
The enumerator of the enumerated type that is entered to the input port labeled by |
|
Int |
The integer entered to this input port. |
|
Float |
The float entered to this input port. |
|
Boolean |
The boolean value entered to this input port. |
|
Array |
The array entered to this input port. |
Inspecting the inputs object
The objects in <input_value> are defined at runtime, depending on which strings, ints, files, and so on are inputted to the tool. But we can use the Test tab to set test inputs, and then inspect the inputs object.
To see the inputs object for your tool description and test values:
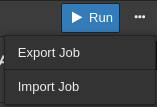
- Click the … icon in the top right hand corner. A pop-up window opens.
- Select the Export Job option.
- Click Export Code.
You will see a pop-up window displaying inputs, expressed in YAML or Javascript Object Notation (JSON) format, for the test values entered. You also have an option to save the object to a file.
In order to get a better understanding of what input_id and input_value denote, let’s create a tool description in the editor that has input ports for different selected data types, and then view the inputs.
Example of the inputs object
We’ll try adding input ports that take a range of different data types as input.
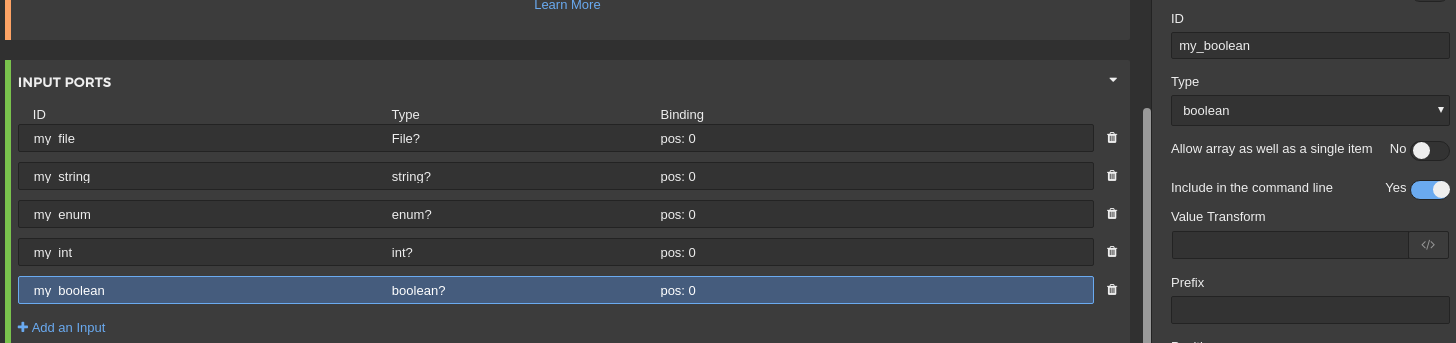
For example, create the following ports in the Input ports section:
- Port ID:
my_file, Input type:file - Port ID:
my_string, Input type:string - Port ID:
my_enum, Input type:enum; enumerations:red,yellow,greenblue - Port ID:
my_int, Input type:int - Port ID:
my_boolean, Input type:boolean
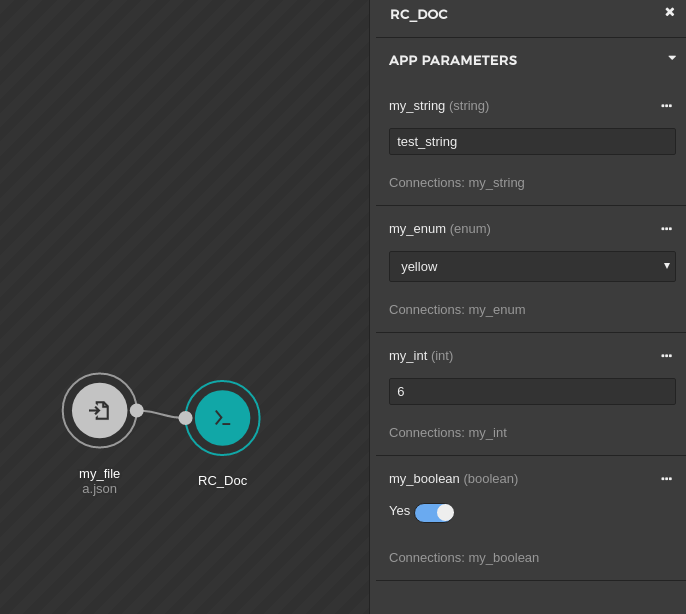
On the Test Tab you can set the values of these ports.
- Set
my_stringtotest_string; - Set
my_intto6; - Set
my_booleantoTrue(indicated by checking the box); - Set
my_fileto../../../a.bam; - Set
my_enumtoyellow(selected from the enumerations we defined when creating the port).
These settings are shown in the screenshot of the Test tab below:
Now that we have set the values for the objects inputted to the tool ports, let’s look at the inputs object. Click … in the top right corner.
The resulting inputs object in YAML looks like this:
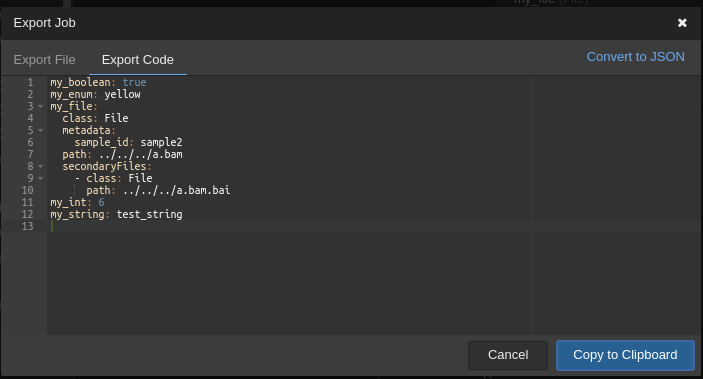
You can see that each input port is associated with the value of the object that is inputted to it, as set on the Test tab. The input port for files, my_file, is associated with the four objects that describe the file inputted to that port: path, class, metadata, and secondaryFiles. These associated objects are the <input_value> for the input ports.
If we were to execute this tool, the values of <input_value> would change to the actual strings, ints, files, and so on inputted to the tool.
Examples of inputs usage
Earlier, we listed fields in which you may want to use the inputs object in dynamic expressions. Here are a few examples:
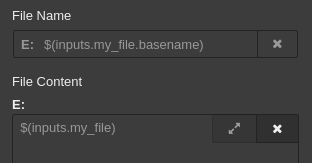
- You may need to set the tool’s required memory to be a function of the size of the inputted file. In this case, you can use the object
inputs.<input_id>.sizeto pick out the size of the file inputted to the port<input_id>. - You can use
inputsto perform linking of input files to the current working directory of the job. To do that, you will need to specify: (a) the file name and (b) the file to be copied/linked.- (a) The file name for the file input to the tool is obtained from the
basenameproperty of the<input_id>object for the input port that takes files. The name of the input file is$(inputs.<input_id>.basename). - (b) The file itself is obtained from
<input_id>, for the input port that takes files. Use:inputs.<input_id>.
- (a) The file name for the file input to the tool is obtained from the
Below is a screenshot showing how these expressions would be entered in the Fire Requirements fields:
The self object
The self object is used to modify the value of the input or output that gets passed to the command line.
- In the command line bindings for the tool inputs,
selfis set to the value of the input. In other words, in this contextselfis justinputs.<input_id>. - In the command line bindings for the tool outputs,
selfis an object with the propertiespathandsizethat match the globbed file.
Examples of self usage
Here are a few examples of how you can use the self object:
self in the Input Ports section
- Use
selffor string manipulation. Suppose that your tool takes input files that are entered on the command line, but expects these to be given as filenames, not as file paths. Sinceselfrefers to the tool input, in the case that files are the input type,selfwill refer to a full file path. By performing string manipulation on this file path, usingself.basename, you can extract the filename. Then, enter this as the input value to the tool. - Another use case for
selfis to manipulate an integer input. Suppose that your tool expects integer inputs in exponent notation, but inputs are given as integers. In this case,selfwill refer to the integer inputted, and you can use an expression in terms ofselfin the Inputs value field to give the integer in its exponent representation.
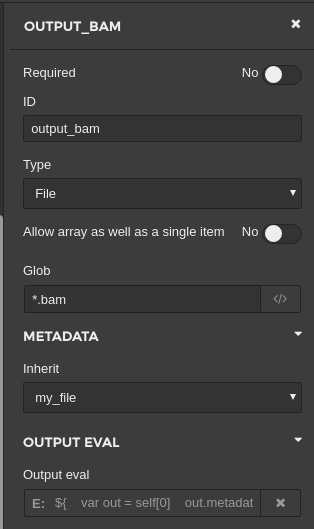
self in the Output Ports section
- In addition to using
selfto refer to a tool’s inputs, you can useself.pathin the Output Ports section to specify to the path of the file matching the glob pattern. You might want to annotate output files with the metadata field ‘file type’, whose value depends on the particular extension of the file being output by the tool. In this case, set the metadata key tofile_typeand set the value to the Javascript expressionself.path.split('.').slice(-1)[0]to refer to the part of the file path after the dot, i.e. the extension. This is shown in the screenshot below.

The runtime object
It is an object with properties related to the running environment. More details are explained in the Common Workflow Language specification.