The workflow editor
About the workflow editor
The workflow editor is a visual editor for creating and editing CWL workflows.
You can follow this simple tutorial to learn more about the workflow editor.
Workflow editor layout
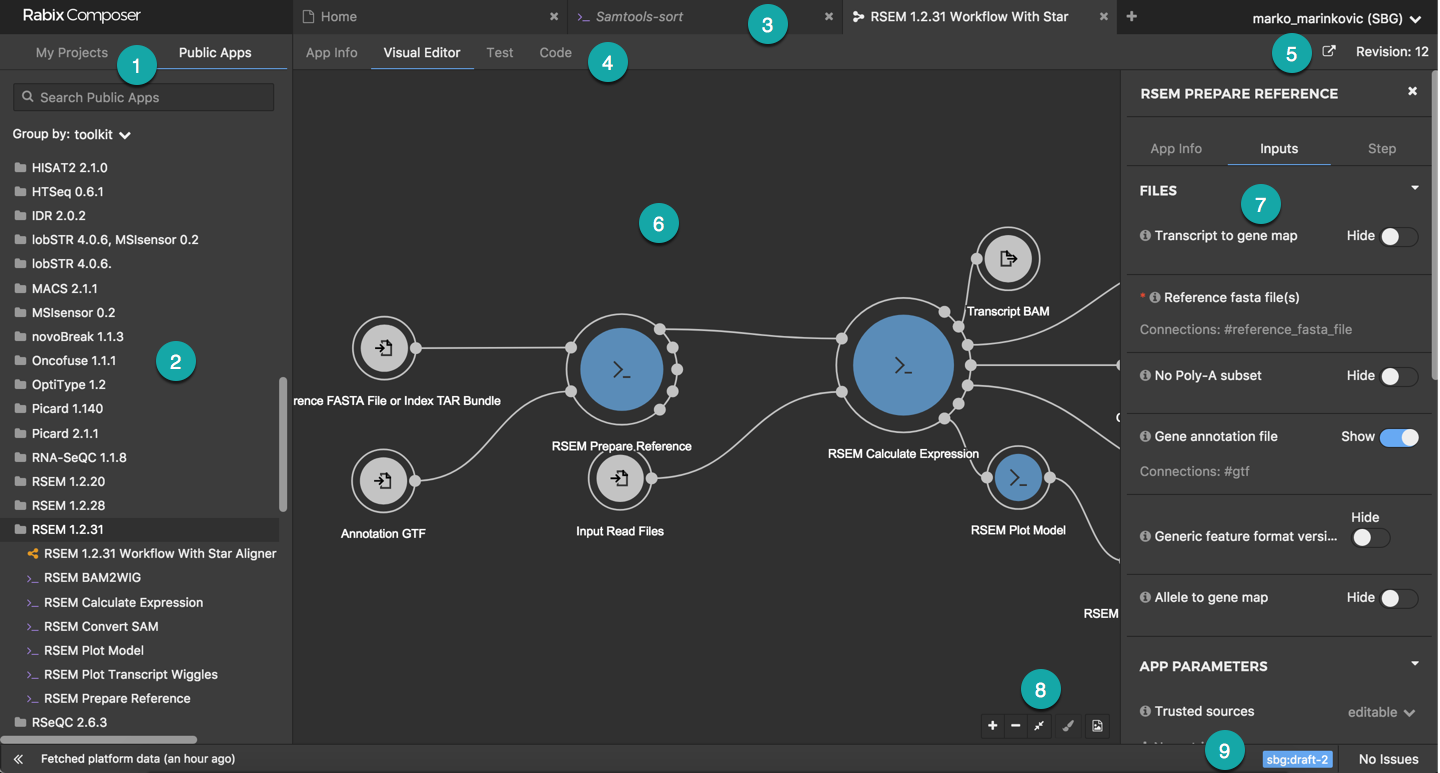
This example shows a public workflow, RSEM 1.2.31 Workflow With Star Aligner, in the workflow editor.
1 Navigation pane tabs allow you to select from My Projects and Public Apps. There is also a search box in this area, and for public apps (selected in this example), the option to group the apps by toolkit or by category.
2 Navigation pane showing (in this example) the public apps on the Platform, grouped by toolkit.
3 Tabs for open workflows and tools.
4 Tabs for workflow editor views (App Info, Visual Editor, Test and Code).
5 Commands available for Platform apps.
6 Workflow editor pane showing a public workflow from the Platform, RSEM 1.2.31 Workflow With Star Aligner.
7 Object inspector for tool node RSEM Prepare Reference in the workflow.
8 Editor functions ( to zoom in, to zoom out, to fit the image to the screen, to redraw the layout and to export the workflow as an SVG image).
9 Workflow status bar, showing the CWL version and the error state.
Editor modes
By default, the workflow editor opens in Visual Editor view, which shows a visual representation of the workflow and allows you to edit the workflow by dragging and dropping apps and connections. There is also a Test view that allows you to set app inputs and run it locally using Rabix Executor, and a Code view, which shows the underlying CWL. Changes made in one view are immediately reflected in the other view so you can use whichever view is most convenient.
The App Info view allows you to see and set general information about the workflow, for example, the author, and a description of the workflow. This information will be available to anyone who uses the workflow or places it as a component in a larger workflow.
Creating a workflow
To create a workflow, click at the far right of the open tabs, select New workflow, then follow the instructions.
You can choose whether to create the workflow in your local workspace or in a Platform project. You can also choose whether to use the older CWL sbg:draft-2 version, or the latest CWL v1.0 version. If you create a local workflow, you can choose whether to use YAML format (file extension .cwl or .yaml) or JSON format (file extension .json). Platform workflows are always created as JSON.
Note: The Platform does not yet allow you to edit CWL v1.0 workflows, although you can run them.
Read about CWL formats and versions to decide which CWL file format and version to choose.
Editing a workflow
Click on a workflow in the navigation pane to open it in the workflow editor. Each open tool or workflow is shown in a separate tab. You can open and edit local workflows and also Platform workflows.
Adding apps to a workflow
To add an existing app (tool or workflow) to a workflow, in the navigation pane, select the app you want to add and drag it into the workflow editor.
Connecting apps in a workflow
To connect an output from one app to an input in another, hover over the output port on the first app and drag it to the input port you want to connect it to on the second app. As you start dragging, any other ports that are of the right type to accept the connection are shown in green.
Note that, to avoid clutter, Rabix Composer only shows mandatory ports in the workflow. You can click on the app node to see a full list of ports in the object inspector. From here, you can click the toggle to show any other ports you want to include.
Adding workflow inputs and outputs
To define an input to the entire workflow, identify the app input node that you want to make into a workflow input. Hover over it and drag it to the left of the app node. This creates an workflow input as a node in the workflow editor.
Similarly, to define an output from the entire workflow, identify the app output node that you want to make into a workflow output. Hover over it and drag it to the right of the app node to create the workflow output as a node in in the workflow editor.
Deleting items
To delete an app, input, output or connection in the workflow, click to select the item you want to delete. Then press your backspace key.
If you delete an item by mistake, you can recover it by selecting Edit > Undo (or Cmd + Z).
Setting item properties
To see and set more properties for an app node, workflow input or workflow output, double-click on the item. This displays additional information in the object inspector on the right hand side of the workflow editor.
The information shown in the object inspector depends on the item that has been selected. For example, if you select an input port, you will see the ID, and the data type. If you select a tool, you will see the tool file inputs and parameters.
Configure file inputs
The Files section in the object inspector shows all file inputs for the selected node in the workflow. The following options are available for a file input:
- Show/Hide - Select whether a file input will be shown in the visual editor. This option is available only for non-required file inputs.
- Link Merge Method - Defines how the input values are handled if the input port is connected to multiple sources.
- Nested - The inputs are merged as an array consisting of array(s) and/or single values as its elements, depending on the provided source parameters.
- Flattened - The input values are flattened into a single array of files by concatenating source parameters which are arrays and appending source parameters that are single elements.
Configure app parameters
The App Parameters section in the object inspector shows all non-file input parameters for the selected node in the workflow. The following options are available for an app parameter:
- Click the dropdown to the right of the parameter label to define how the parameter value is provided:
- Default - Allows you to provide a parameter value that can’t be changed when the workflow is executed on the Test tab.
- Exposed - The parameter is exposed for editing on each execution of the workflow on the Test tab.
- Port - The parameter becomes an input port that you can connect to an adequate output port of another node to obtain the value. Or, you can grab the port and drag it to the left to allow parameter value to be defined when executing the workflow, similar to the Exposed option above.
- Link Merge Method - Defines how the input values are handled if the input port is connected to multiple input sources.
- Nested - The input values are merged as an array consisting of array(s) and/or single elements, depending on the provided source parameters.
- Flattened - The input values are flattened into a single array by concatenating source parameters that are arrays and appending source parameters that are single elements.