The tool editor
About the tool editor
The tool editor is a visual editor for creating and editing CWL tools. The process of creating a CWL tool from a command line tool is often known as wrapping a tool.
If you are not familiar with the tool wrapping process, or if you would like a refresher, we recommend you read the introduction to tool wrapping then follow this simple tool editor tutorial before using the tool editor to wrap your own tool.
Tool editor layout
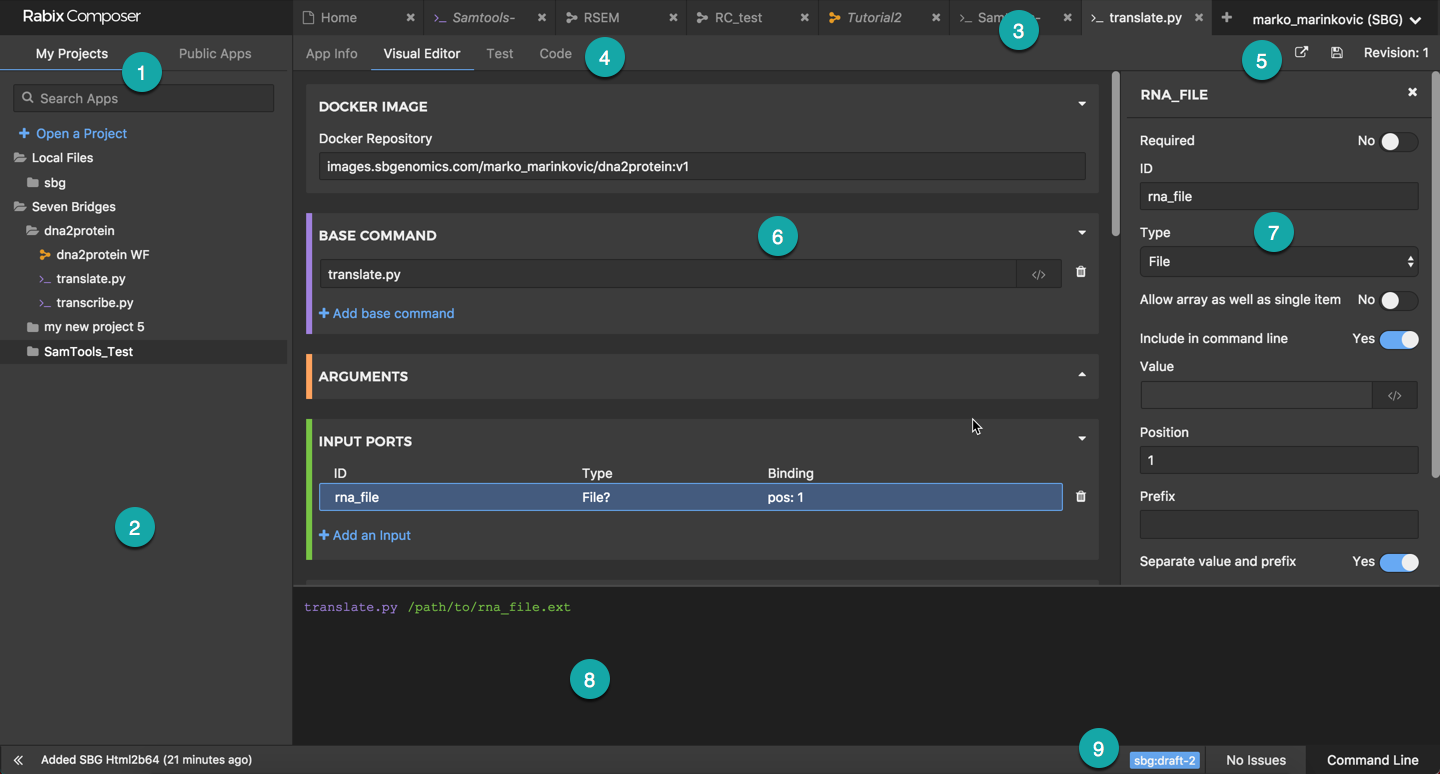
This example shows a local tool in the tool editor.
1 Navigation pane tabs allow you to select from My Projects and Public Apps. There is also a search box in this area, and for your local files and projects (selected in this example), the option to open a project, which allows you to add new apps or projects.
2 Navigation pane showing (in this example) local apps and apps from Platform projects.
3 Tabs for open workflows and tools.
4 Tabs for tool editor views (App Info, Visual Editor, Test, Code).
5 Commands available for Platform apps (Open on Platform and Save).
6 Tool editor pane.
7 Object inspector showing properties of an input port of the tool being described in the tool editor. The items shown here vary depending on the object that has been selected, and in some cases, on other selections in the object inspector.
8 Preview pane showing a preview of the command that is being built up in the tool editor.
9 Tool status bar, showing the CWL version and error state. For tools, this area also has a toggle to show and hide the Command Line pane.
Editor modes
By default, the tool editor opens in Visual Editor view, which contains a section for each component that needs to be defined when the tool is being wrapped. There is also a Code view, which shows the underlying CWL. Changes made in one view are immediately reflected in the other view so you can use whichever view is most convenient.
The App Info view allows you to see and set general information about the tool, for example, the author, and a description of the tool. This information will be available to anyone who uses the tool or places it as a component in a larger workflow.
The Test view allows you to set values for tool input parameters, so you can see the command string that would be generated if the tool was executed with those parameters. You can learn more about the test view here.
Command preview and test
As you complete the sections in the tool editor, you are building up the parameters and options for the command that will be executed when the tool is run.
The preview pane shows the command that is being built up as you specify values in the various sections of the tool editor. If the preview pane isn’t already shown, click Command Line at the bottom right of the tool editor to show it. As you modify the arguments and input ports in the tool editor, the preview command is updated to show the effect this has on the command line that will be generated from these values.
Initially, the preview pane shows generic placeholder values for input parameters. The Test view allows you to set test values for the input parameters and run the tool locally using Rabix Executor. This is useful if you have used dynamic expressions for some of your inputs as you can check that the expressions evaluate correctly. Once you have specified the test values for inputs, the preview pane is updated to use those values instead of generic placeholder values.
Any test values you specify are saved with the tool definition.
Creating a tool
To create a tool, click at the far right of the editor tabs, select New Command Line Tool then follow the instructions.
You can choose whether to create the tool in your local workspace or in a Platform project. You can also choose whether to use the older sbg:draft-2 version of CWL, or the latest CWL v1.0 version. If you create a local tool, you can choose whether to use YAML format (file extension .cwl or .yaml) or JSON format (file extension .json). Platform tools are always created as JSON.
Read about CWL formats and versions to decide which CWL file format and version to choose.
Note: The Platform does not yet allow you to edit CWL v1.0 tools, although you can view tool descriptions and run tools. Support for editing CWL v1.0 tools will be added shortly. There are also minor differences between CWL sbg:draft-2 and CWL 1.0 when wrapping tools.
Editing a tool
Double-click on a tool in the navigation pane to open it in the tool editor. Each open tool or workflow is shown in a separate tab. You can open and edit both local and Platform tools. The tool editor has the following sections:
Docker image
This is the location of the Docker image containing the tool.
If the image is in the Seven Bridges image registry, the format is
images.sbgenomics.com/<repository>/<imagename>:<tag>
where:
- <repository> is your Platform user name, all in lowercase, and with any non-alphanumeric character in your username replaced with an underscore (“_”).
- <imagename> is the unique name of the image
- <tag> by convention, is the version number of the image.
If the image is in Docker hub, the format is
<docker-repository>:<tag>
where:
- <docker-repository> is the name of the Docker repository containing the image
- <tag> by convention, is the version number of the image.
Base command
The base command is the part of the command before any items you want to specify as inputs to be resolved at runtime. This will include the command itself, and usually the sub-command, if present. It may also include command options and parameters that you want to set to hard-coded values, provided these can be positioned at the start of the command line. Alternatively, hardcoded command options and parameters can be defined as arguments, which can have defined positions in the command line.
You can specify everything in the base command as a single section, or, if you are using CWL sbg:draft-2, you can build this up in multiple sections. If you want to include dynamic expressions in the base command (CWL sbg:draft-2 only), you will have to use separate sections for each fixed part and each dynamic expression as you can’t mix fixed items and dynamic items in the same section.
Note: If you are using CWL v1.0, you cannot include expressions in the base command, so any dynamic expressions need to be specified as an argument, not as part of the base command.
Arguments
Arguments are command options and parameters that you want to set to hard-coded values when the tool executes. You can include dynamic expressions in arguments, for example, you could use an argument to specify the name of an output file, and hard-code it to a fixed expression based on the name of an input file.
If the argument could be positioned immediately after the base command in the command line, you could set it as part of the base command instead. But note that CWL v1.0 does not support dynamic expressions in base commands, so if you need a dynamic expression you will have to use an argument.
Set the values in the object inspector as follows:
- Use command line binding: whether to use command line binding. Set this option if you need to specify a prefix or a position (or both) for the argument, and clear it if the argument is a simple value or dynamic expression.
- Prefix (shown if Use command line binding is selected): any prefix required by the argument. If the prefix is separated from the value by “=”, include “=” in the prefix string. Leave blank if not required.
- Expression (shown if Use command line binding is selected): the value to use for the argument. This can be a dynamic expression.
- Separate value and prefix(shown if Use command line binding is selected): whether there is a space between any prefix and the value.
- Position (shown if Use command line binding is selected): the position in the command line to place this argument, if applicable. Position ordering includes both arguments and commands in a single numbering sequence. Position values are relative, not absolute, so, for example, if you had two positional arguments and one positional input, you could specify positions -1, 3 and 99. Defaults to 0 if not set.
- Value (shown if Use command line binding is cleared): the value to use for this argument. This can be a dynamic expression.
Input ports
Input ports correspond to the variable parameters that can be set each time the tool is executed.
The following properties can be set in the object inspector for an input port. For more information, see the Seven Bridges Platform documentation.
- Required: whether this input is required.
- ID: identifier of the input. This is shown against the input when the tool is placed in a workflow, and is also used to specify the value of the input parameter if the tool is run using Rabix Executor.
- Type: the type of the input. Valid values are array, enum, record, File, string, int, float, boolean and map (a JSON/YAML HashMap with string keys and string values, CWL sbg:draft-2 only).
- Items type (only shown if Type is array): The type of the items in the array. Valid values are enum, record, File, string, int, float, boolean and map.
- Allow array as well as single item (not shown if Type is array): whether the input is capable of accepting multiple items. If you set Type to a non-array type, and set Allow array as well as single item, the input can either be a single item or an array, whereas if you set Type to Array, and set Items type to an element type, execution will fail if a single item is supplied instead of an array.
- Symbols (only shown if Type is enum, or Type is array and Item Type is enum): a list of the valid values for the input item.
- Include in command line (not shown for map): whether to include this input item in the command line. Usually this will be set, as most inputs to the tool will be included in the command line, but occasionally you may want to supply an input to the tool which can be used in dynamic expressions to define other inputs, but doesn’t appear in the command line itself.
- Value (not shown if Type is record, or Type is array and Item Type is record): the value to assign to this input. This is optional (the value for an input port will commonly be set when the tool is executed). If supplied, this must be a dynamic expression, which will probably be constructed to transform the value supplied for that input, or to define a default value from other inputs.
- Position: the position in the command line to place this input, if applicable. Position ordering includes both arguments and commands in a single numbering sequence. Position values are relative, not absolute, so, for example, if you had two positional arguments and one positional input, you could specify positions -1, 3 and 99. Defaults to 0 if not set.
- Prefix: any prefix required to identify the input. Leave blank if not required.
- Separate value and prefix: whether there is a space between any prefix and the value.
- Item separator (only shown if Type is array): the separator to use between the elements in the array. One of equal, comma, semicolon, space or repeat (this sets the separator to null, and repeats the prefix in front of every item in the array).
- Stage input (CWL sbg:draft-2 only, and only shown if Type is record or File, or Type is array and Item Type is record or File): whether to make any file data available in the tool’s working directory. One of None (the file is available as an input to the tool, but isn’t copied into the tool’s working directory) Copy (the file is copied into the tool’s working directory) or Link (a symlink to the file is copied to the tool’s working directory). You can read more about using staged inputs here.
- Secondary files (only shown if Type is File, or Type is array and Item Type is File, and, for CWL sbg:draft-2, if Include in command line is set): an optional file extension for a secondary file related to this file, if the tool supports it, for example an index file associated with a BAM file. You can read more about using secondary files [here] (http://docs.sevenbridges.com/docs/tool-input-ports#section-secondary-files).
- Description: more information about the functionality of the input port. This is provided to help the user of the tool when the tool is placed in a workflow, and does not affect operation of the tool. If provided, the Label value is shown against the input port in the workflow editor. For CWL V1.0 tools only, if the input port Type is File, Files specifies the valid file types that can be connected to this port (for example, TXT, BAM).
Output ports
Output ports correspond to the items that are produced when the tool is executed.
The following properties can be set in the object inspector for an output port. For more information, see the Seven Bridges Platform documentation.
Set the values in the object inspector as follows:
- Required: whether this output is required.
- ID: identifier of the output. This is shown against the output when the tool is placed in a workflow.
- Type: Type: the type of the output. Valid values are array, enum, record, File, string, int, float, boolean and map.
- Items type (only shown if Type is array): The type of the items in the array. Valid values are enum, record, File, string, int, float, boolean and map.
- Allow array as well as single item (not shown if Type is array): whether the output is capable of accepting multiple items.
- Symbols (only shown if Type is Enum, or Type is array and Item Type is enum): a list of the valid values for the output item.
- Glob: A wildcard pattern for the nam es of the files in the tool’s working directory that will be associated with this output port. For example, setting a value of *.bam will associate all BAM files with this output port. Note that subfolders are not searched recursively, although you can specify a subfolder as part of the glob syntax if required. You can read more about using globs here.
- Metadata (only shown if Type is File, or Type is array and Item Type is File): the metadata to annotate the file with. The Inherit field allows you to specify which input file to inherit the data from, and you can also add additional metadata as Key, Value pairs. You can read more about metadata on the Seven Bridges Platform here, including best practices and predefined metadata fields.
- Output eval: a JavaScript expression that will be used to access and manipulate the first 6KiB of the output file or files. Load contents specifies whether the content is actually loaded, and hence can be manipulated, or just read. You can see an example here.
For CWL 1.0 tools, the Output Eval field will be populated with the expression that will be used for inheriting metadata. If there is a conflict, you will see a warning under the ID field and will be able to solve the issue by editing the expression in the Output Eval field.
- Secondary files (only shown if Type is File, or Type is array and Item Type is File): an optional file extension for a secondary file related to this file, if the tool supports it, for example an index file associated with a BAM file. You can read more about using secondary files [here] (http://docs.sevenbridges.com/docs/tool-input-ports#section-secondary-files).
- Description: more information about the functionality of the output port. This is provided to help the user of the tool when the tool is placed in a workflow, and does not affect operation of the tool. If provided, the Label value is shown against the output port in the workflow editor. For CWL V1.0 tools only, if the output port Type is File, the Files field in this section specifies the valid file types that can be connected to this port (for example, TXT, BAM).
Computational Resources
Computational resources specify the minimum resource requirements for the tool. The execution will fail if the resources specified here cannot be allocated.
- Memory (min): the minimum amount of memory required to execute the tool. This can include a dynamic expression.
- CPU (min): the minimum number of CPUs required to execute the tool. You can select between single-thread and multi-thread options, or set a custom number of CPUs. The Custom option can include a dynamic expression.
Hints
Hints specify execution requirements and suggestions, for example, the AWS instance type to use. Class: the class of hint you are setting. The available classes are listed here.
- Value: the value of the hint. This can be a dynamic expression.
File Requirements
These are any additional files the tool needs to run that aren’t already included in the Docker container. For example, you could specify a configuration file here instead of installing it in the Docker container. Any files specified here will be created in the working directory when the tool executes.
- File name: the name of the file to be created when the tool executes. This can be a dynamic expression.
- File content: the contents of the file.This can include dynamic expressions.
One of the common uses of file requirements is to make input file(s) available in a tool’s working directory, which is also known as staging input files. This needs to be done if a tool expects to find a file directly in its working directory.
To stage an input:
- In the File Requirements section click Create a File.
- In the File Content field click </> to add an expression.
- Enter the following expression:
$(inputs.<input_id>)In the code snippet above, replace
<input_id>with the ID of the input port that takes the file. - Click Save.
Staging has now been set up.
This expression is entered as InitialWorkDirRequirement in the tool’s CWL description. For more details, see the CWL specification on staging input files.
Other
The stream files are optional. They allow you to specify files to use for standard input or standard output.
Stdin redirect: If you want to pipe data into standard input when the tool runs, enter the name of the file containing the data here. The filename can include a dynamic expression.
Stdout redirect: If you want to save the standard output from the tool, enter the name of the file you want to use here. The filename can include a dynamic expression.
Success Codes: Define which app exit code(s) will be treated as success codes.
Temporary Fail Codes: Define which app exit code(s) will be treated as temporary fail codes.
Permanent Fail Codes: Define which app exit code(s) will be treated as indicators of permanent failure.
App Info tab
The App Info tab contains information about the tool. This information is shown when the tool is placed in a workflow.
Hover over a field to see the Edit option.