Tutorial 2: A local workflow
Creating and executing a workflow locally and on the Platform
Time to complete
10 minutes plus Platform execution time (approximately 5 minutes).
Objective
In this tutorial, we will:
- create a local workflow containing two public tools, their inputs, outputs and connections
- learn about some additional features of the workflow editor
- use integrated Rabix Executor to run and test our workflow locally
- upload our workflow to the Platform, execute it there, then view the output data graphically.
As before, we will use FASTQC, which reads a set of sequence files and produces a quality report for each one as a zip file. We will connect the output zip files from FASTQC to SBG Html2b64, which converts the quality data into b64html format, which can be displayed graphically.
Prerequisites
Before starting this tutorial, you need to:
- Install Rabix Composer
- Set up Rabix Composer
Step 1: Use Rabix Composer to create a local workflow
Open Rabix Composer. Click + at the top right to create a new tab in the editor.
In the tab that is created, click New workflow, then Local Files.
Specify Tutorial2 for the app name, and take care to set CWL Version to sbg:draft-2 as we will eventually run this app on the Platform. Finally, choose a destination folder for the workflow.
Click Create to create the local workflow. The new workflow opens in the Visual Editor view.
Step 2: Use the visual editor to add the FastQC and SBG Html2b64 tools to the workflow
In the navigation pane, click Public Apps and enter FastQC in the search box. Select the tool called FastQC and drag it from the left-hand side to the workflow canvas (tools have this icon . The FastQC tool is placed on the workflow canvas with one input port and one output port.
Repeat the process to add SBG Html2b64 (also listed in the Public Apps tab).
FastQC reads a set of sequence files and produces a quality report for each one as a zip file. SBG Html2b64 takes a quality report zip file and converts it into a format that can be displayed graphically on the Platform.
Step 3: Inspect the tool details for SBG Html2b64
Double click on SBG Html2b64. The object inspector opens on the right, showing the properties of the tool. Click App Info to see the information that was provided by the creator of the tool.
Click Inputs. This shows the tool input ports. In this case, note that there is an input port called Input file, but that there is no input port shown for that tool in the workflow editor. That’s because the tool creator made this input port optional. The Rabix Composer workflow editor doesn’t show optional ports unless they are enabled, to avoid clutter, whereas the workflow editor on the Platform shows all ports. We think making this port optional is probably an oversight by the tool creator, but you can enable the port now, by clicking the Show toggle. You can now see the input port in the tool editor.
Click Step. You will see some information about this step in the workflow (tool Html2b64). We will use see how to use some of these fields shortly.
Step 4: Connect the tools and add workflow inputs and outputs
Remember you can delete tools, connections, inputs and outputs using the Backspace key, and undo the deletion using Edit > Undo.
Hover over the tool input port of FASTQC (labelled Input file) and drag it to the left to add a workflow input labelled input_fastq.
Hover over the FASTQC output port, and start dragging as before. But this time, connect to the input port of SBG Html2b64.
Hover over the SBG Html2b64 output port and drag it to create a workflow output. This will be the final output of the workflow, formatted in a way that can be displayed graphically on the Platform.
Finally, go back to FASTQC, hover over the output port again, and drag to create another workflow output. This means that your intermediate zip file will also be saved as a workflow output. In a more complex workflow, saving intermediate files can make debugging easier.
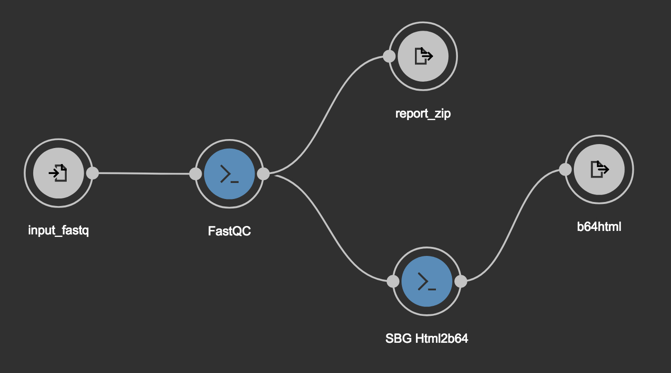
Your workflow should now look like this.
Step 5: Scatter the output from FastQC into multiple instances of SBG Html2b64
Scattering is a process that allows you to take an output array from one tool or workflow, split it into single items, then pass each item to a separate instance of the receiving tool. Usually this is done to reduce processing time, as the multiple instances may be able to run concurrently. But here it’s necessary because FastQC outputs an array of files but SBG Html2b64 can only process a single input file. SBG Html2b64 will report an execution error if the input isn’t scattered into multiple single instances of the tool.
To scatter the input into SBG Html2b64, double-click on SBG Html2b64 in the workflow editor to show the properties panel. Click Step, and select the Scatter drop-down to see a list of the inputs that can be scattered. Select Input file (#input_file).
Step 6: Save the workflow
Click the Save icon at the top right of the workflow canvas, then click My Projects in the navigation pane. You will see the workflow you have just created in your local workspace.
Step 7: Get local copies of the Platform files needed for the workflow
We’ll download a local copy of the paired end read files we used in the workflow editor tutorial 1. On the Platform, select Data > Public Reference files and enter ~merged-tumor.converted in the search box. You should see two files, merged-tumor.converted.pe_1.fastq and merged-tumor.converted.pe_2.fastq. Select both files then click Download and save them to your local workspace.
Step 8: Run the workflow locally using Rabix Executor
- In the workflow editor open the Test tab.
- Double-click the input_fastq input node.
- In the object inspector on the right click Set Value below input_fastq.
- Click New File.
- Click and find the downloaded merged-tumor.converted.pe_1.fastq file.
- Repeat the previous two steps for merged-tumor.converted.pe_2.fastq.
- Click Run in the top-right corner. Workflow execution begins.
This should take a two or three minutes. When it completes, click in the execution pane at the bottom of the screen to open the workflow output directory.
Step 9: Push the workflow to the Platform and run it
When you are happy that the workflow runs as you expect locally, you can push it to the Platform and run it with real data. We will use the same paired-end reads to test the tool on the Platform. If you followed workflow editor tutorial 1, you have already copied them from the public reference files to the project. If not, copy these files to your Platform project now (see workflow editor tutorial 1, step 8).
To push the workflow to the Platform, in Rabix Composer, in your local files, open the Tutorial2 app. Click the Push to Platform icon to push it to the Platform. Specify an App Name of your choice and the Destination Project project that you used in Tutorial 1, then click Publish. The tool is copied to the Platform and shown below the appropriate project folder in the Rabix Composer navigation pane.
In Rabix Composer, open the Platform copy of the tool, then click to open the app on Platform. From here, click Run to create a task to run the tool. Note that this doesn’t actually run the tool: it just creates a task from which the tool can be run.
Click Select File(s), and select merged-tumor.converted.pe_1.fastq and merged-tumor.converted.pe_2.fastq. Click Save.
There are no app settings required, so just click Run to run the task. This analysis will take around five minutes to run, and you will receive an email when it completes.
Step 10: View the results
On the task page for this execution on the Platform, you can see the output files. There are two b64html files and also the two intermediate zip files which we saved as an output from the workflow as well.
In the Outputs column on the right hand side of the page, click merged-tumor.converted.pe_1_fastqc.b64html to see a graphical representation of the quality data in merged-tumor.converted.pe_1_fastqc.zip.